Sunday, November 4, 2012

Chocolate Chocolate Chip Cookie Dough Cupcakes

So this all started when me and a girl I work with (who happens to be pregnant) started talking about cupcakes.  Before it was over with, we had both convinced me that I needed to make this.


To start, you need to whip up some chocolate cupcake batter.  I prefer my recipe that I have finally figured out for myself, so here it is again if you need it.

Chocolate Cupcake Recipe
2 cups room temperature unsalted butter
2 cups sugar
3 eggs
1 teaspoon vanilla
2 1/2 cups all purpose flour
1 cup cocoa powder
2 teaspoons baking powder
1/2 teaspoon salt
1 box instant chocolate pudding
1 1/2 cups milk

When filling your cupcake liners, fill them slightly over half-way full.  If you fill them like normal and then add the cookie dough, your cupcakes will over-flow when they bake.

Now, for your cookie dough, you are more than welcome to mix that up from scratch.  I bought a tub of cookie dough and used that. ;)

I used a half tablespoon and scooped out the cookie dough and rolled it into a ball.  Place it in the center of your cupcakes and push down slightly.  Your cupcakes will bake up around the cookie dough.


Bake these at 350 degrees for about 15-16 minutes.  You don't want to over bake these and the cookie dough will settle in the middle when you take them out, so don't panic.

Cookie Dough Frosting
3 sticks butter
3 1/2 cups powdered sugar
2/3 cups packed light brown sugar
1 cup all purpose flour
3 tablespoons milk
2-3 teaspoons vanilla
chocolate chips for garnishing, if desired

I don't usually prefer the taste of alot of butter in a frosting recipe, but for this, it worked well.  If you don't like the butter at all (which I usually don't), feel free to substitute it with shortening.

Top your cupcakes with the frosting and chocolate chips, and you're good to go!


Motocross Helmet Cake

Ahh, I loved making this cake!  It was so fun and I was so excited to do this!  This is a motocross helmet birthday cake.


For the helmet, I used two 6-inch round pans and half of the sports ball pan.  I stacked them and then chilled them so that I could carve out the face.  Just carve it smooth down the front.  Then, using rice crispie treats, I made the mouth piece.  Then, I covered the cake in buttercream and MMF.

For the visor, I used red gumpaste and had it sitting to take the shape that I wanted.  I almost hit panic mode because it didn't set up and get hard.  Not sure why - it just wasn't working out.

So, I had a brilliant idea. :)  I took a piece of clear plastic from a package of stencils I had in my cake cabinet, washed it and cut it out in the shape of the visor - leaving a couple inches on the end extra.  I stuck that end into the cake and laid the gumpaste over it.  YAY!  It worked!

For the design on the helmet, I just mixed up a little black gel food paste coloring with some vanilla extract and painted it on.

Halloween Ghost Cupcakes

Just as I did last year, I had to make cupcakes for my boyfriend's niece and nephew's Halloween party!  This year, I used an idea that I seen in Betty Crocker's Easy Fall Entertaining magazine.  (That magazine also has some awesome dinner recipes.  Yum.)


I made vanilla cupcakes and topped them with orange buttercream.  Then, you just take a dum dum sucker and stick in the middle of the cupcake.

For the ghost, cut out 2 1/2' circles from fondant and just drape them over the suckers.  Then pipe on some "Boo"s and some eyes.

Way cute.  And these were so fun!

Baby Rump Shower Cake

I was so excited to do this cake!  I couldn't wait!  I love the baby rump cakes and I love zebra cakes.  This cake has both!


The cake also has three flavors.  The bottom 10-inch cake is oreo cake.  The middle 8-inch tier is red velvet cake.  The top layer is half of the sports ball pan and it's white cake.  The entire cake is covered and decorated with MMF.

Hello Kitty Birthday Cake

This is a Hello Kitty themed birthday cake for a little girl.  It's white cake covered and decorated with MMF.


I used a template printed from Google for the shape of the head and bow.  The rosettes around the bottom are also made with MMF.

Buzz Lightyear Cake

This cake was made for a co-worker for her son's birthday.  It's chocolate cake covered and decorated with   MMF.  The figurines are toys.


It's a Monkey Party!

My friend Tiffany asked me to make not one - but TWO cakes for her niece's birthday party.  She wanted her to have her own cake

The first cake I finished up was the cake for the little girl.


This is a 6-inch round cake covered with MMF.  It's topped with a fondant cell phone and some texting lingo.  The monkey on the front of the cake is also made with MMF.


This is the cake for everyone else.  I will admit, I got slightly carried away and made the fondant monkey too big for this cake.  Haha.  It still turned out cute, though.  At least I think so.

Skeleton Cake

This cake was made for a co-workers birthday.  I had so much fun with this.


I used two half-sheet cakes and stacked them on top of each other.  I made oreo cake (again - if you haven't noticed, it's one of my favorites).  I then covered the entire cake with black tinted buttercream.

To make the skeleton, I printed a skeleton onto a piece of paper (I got the skeleton from Google).  I then placed the skeleton paper under a piece of wax paper.  Using white chocolate, I traced the skeleton.  It only took several minutes to set up.  Once it was dry, I just placed the pieces of white chocolate onto the cake.  The party had is fondant.

Fall Wedding Cake

This cake was made for a fall-themed wedding.  Once again, I was sent a picture and tried my best to duplicate it.


The cake is marble cake covered in MMF.  The leaves and rope borders are all made with MMF as well.

Hummingbird Birthday Cake

For this cake, I was asked to make a hummingbird.  I was sent a picture, and tried my best to duplicate it.  Even though I didn't get it exactly like the picture, I was pleased with it.


The cake is chocolate decorated with buttercream.  I made the head and beak with fondant.

Cheerleading Birthday Cake

I was sent a picture of a cheerleading cake to make for a little girl's 10th birthday.  I was pretty much told to make it look nice and use the colors black, white and silver.  Here's what I did.


I made the number 10 with gumpaste. The rest of the cake is covered and decoarted with MMF.

Call of Duty


This is a Call of Duty themed cake.  It's an 8-inch round cake covered in MMF.  I just mixed the different colors of fondant and rolled them out to get the camo look.


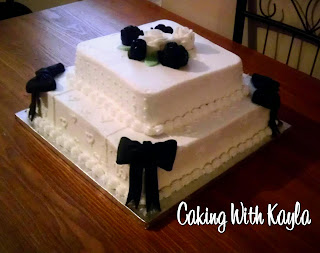
25th Anniversary Cake

I was sent a picture and asked if I could make a cake very similar to it for a 25th anniversary party.  This is what I ended up with.


The colors were black, white and silver.  The entire cake is covered and piped in buttercream and the roses and bows are made with fondant.  The cake itself is lemon cake.


Monster High Birthday

I am combining two cakes for this one post because I made back to back Monster High birthday cakes for two different little girls.


 This cake was the first one. This is oreo cake covered and decorated with MMF.  I printed out the shape of the skull online and used it to cut out the fondant skull.  I then used an edible/icing marker to draw on the eyes and the nose.


I really liked the color combination of this cake.  I think it turned out really cute. :)


This cake is white cake covered and decorated with MMF.  I used the same idea on the skull, using a template that I printed.  Once again, I used then icing marker for the eyes.


I also made some cupcakes to go with this cake. :)

Icecream Cone Cupcake

I have been dying to try this.  And I assumed it would be easy - just bake a cupcake in the icecream cone, right?

To start, I wanted to put my Neopolitan Cupcakes inside of these.  It seemed like a fabulous idea.  When I was filling them, I filled them up to about 1" from the top.  DO NOT DO THAT! haha With that recipe that I used, I recommend going no higher than 2/3 of the way up from the cone.  I think it will really depend on how your cake batter rises, so even take a test run if you have to.

What happens when you over fill them, is that they run over, of course, and then your icream cone has cake batter running down the side of the cone, causing the cone to get gooey.  It's not good.

So take your time with these and test out your batter on a couple of cones first.  That's my recommendation for these, especially if you're using a made from scratch recipe.

After all was said and done, they were cute.  I personally didn't care for the icecream cone. lol


To transport them, I placed them in a small clear plastic cup and surrounded them by M&M's to hold them in place.

Anniversary Cake

I was asked to make an anniversary cake and make it similar to the Neopolitan cake that I made previously, minus the strawberry.

So the cake is alternated with white, chocolate and then white cake.  The buttercream is alternated opposite of that - chocolate, vanilla, and chocolate.  I also thought it would look more classic if I tinted the chocolate buttercream black.


Football Helmet Fun!

I'd like to apologize again because I have been slacking, so I'm going to play catch up with my cakes again. *haha*

I bought the plastic football helmet pan and was dying to try it - mostly because I hadn't used any of the plastic pans yet.  Not to mention, we love football.

To start, I made a WVU helmet cake for the opening game of the season.  It's chocolate cake decorated in buttercream.


This turned out to be a pretty big deal for people.  I will admit that this was a very easy cake to do.  So if you want a helmet cake and want it to be easy, I would go for this pan. :)

The very next weekend, I made this for my buddy, Dan, at work.


I had so much fun making both of these, even though I am a hardcore WVU fan. ;)